Getting started with AWS IQ requests
In AWS IQ, you create a request with detailed information about what you want an AWS Certified expert to do for you. This topic provides guidelines for creating requests.
Prerequisites
To create a request in AWS IQ, you need the following:
-
An AWS account with a payment method on file.
-
An AWS Identity and Access Management (IAM) user with an
AWSIQFullAccessmanaged policy to accept proposals and payments from experts. -
Either an AWS account root user or an IAM user account with
IAMFullAccesspermissions to grant experts permission to your AWS account. To learn more about required account permissions, see Setting up account permissions to use AWS IQ. -
One of the following supported browsers: Google Chrome (version 72 or higher), Mozilla Firefox (version 66 or higher), or Apple Safari (version 10 or higher).
Creating a request
To create a request
-
Go to the AWS IQ home page at https://iq.aws.amazon.com
. 
-
At the top of the page, enter your Request title and a Description of your request, and then choose Next.
You are directed to the AWS sign-in page.
Note
Alternatively, you can scroll to the bottom of the page and choose Get started now. You will be directed to a new request form where you can provide your information and then choose Submit.

-
Sign in to AWS.
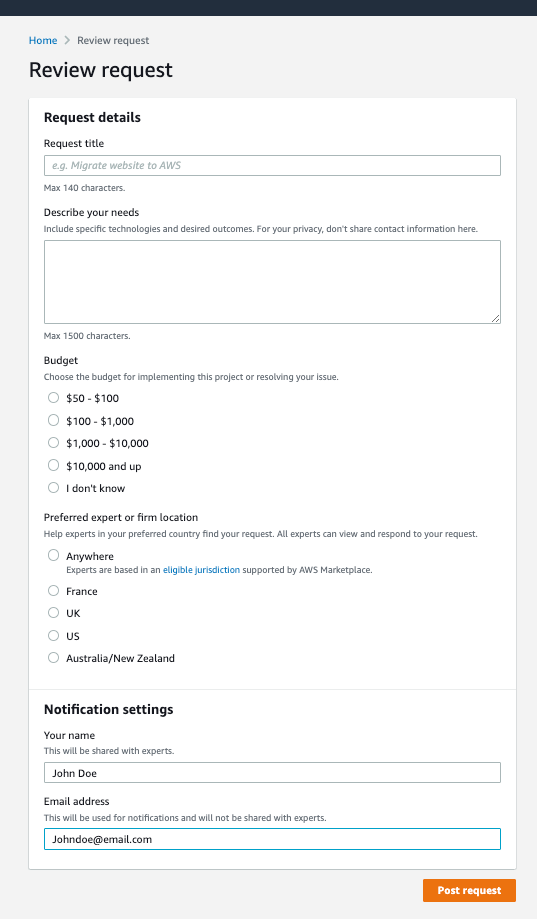
The Review request page appears.

-
Review and provide information for all of the fields. All fields are required when creating a request.
The fields Your name and Email address are filled in automatically from the information in your AWS account. You can edit these fields if necessary.
-
Choose Post request.
The following sections provide tips for filling out the request form.
Creating a title
When you create a descriptive title, your request stands out to AWS Certified experts. Think of good keywords to use, such as mentioning a specific service name or technology area. The following table provides some examples of what to avoid and what to use instead when you create a title.
| Avoid | Try this instead |
|---|---|
| “Need help” | Need help with IAM permissions |
| “Blocked” | Unable to connect to my database |
| “Request” | Request for a guided tour of machine learning capabilities |
| “Feedback” | Feedback needed on our proposed architecture |
Titles must be at least 10 characters long but no longer than 140 characters.
Creating a description
Like a good title, a detailed description helps experts understand your request better. Clear descriptions help reduce extra requests for more information to design a project plan for your needs.
Describe your request with the right level of detail. Include information about what, specifically, you want hands-on help with. Include information about your timeline. Provide information about things you have tried already or specific services you’re using.
The Description field accepts plaintext only (no formatting, markup, or markdown). Line breaks are ignored.
Descriptions must be at least 30 characters long but no longer than 1,500 characters.
Example description
We want to move to AWS and need help with migrating our WordPress site from our existing host provider. We have custom themes and 3 years' worth of content and media files, and we're not sure where to start. We'd like someone to migrate our site to AWS. We think we want to use Amazon Lightsail but are open to other options. Ideally we'd like this project finished within 2 weeks.
Selecting your preferred expert company location
Experts are based in eligible jurisdictions supported by AWS Marketplace.
If you prefer to connect with experts based in a specific location, select an option from the list. You can update the country of the preferred expert company at any time, but experts from any location can respond to you.
If you don't have a preference, select Anywhere.
Providing your name and email address
To complete your request, add your preferred name and email address. AWS IQ sends notifications to your email address, which is not shared with experts. AWS IQ uses your preferred name when you chat with experts.
Your name and email address will be prefilled with the information in your AWS account. However, you can edit your name and email address in the form if you want.
Your preferred name must be at least 1 character but can't exceed 30 characters (including spaces).
Your email address must be formatted correctly (for example, marymajor@example.com). Your email address can't exceed 254 characters.
Next steps
After you submit your request, AWS IQ shares your request with AWS Certified experts. It can take a few minutes to a few days for an expert to respond. If an expert responds to your request, you get an email notification.
You can make more than one request at the same time. To view all your requests, choose Requests in the navigation trail.
Stop receiving responses to a request
If you've received enough responses or you've found the expert you want to work with, you can hide your request. To stop getting responses, turn off the Accepting new responses setting on your request page. You can turn it back on at any time.

Similarly, if you no longer need a request, you can turn off this setting. You will still see your request, but you won't receive new responses from experts.
Important
You can't delete a request in AWS IQ. After you create a request, AWS IQ publishes it to experts to read and respond. If you have received enough responses, turn off the Accepting new responses toggle for that request. You can provide more details when you start chatting with an expert, or you can edit your request by selecting the pencil icon.