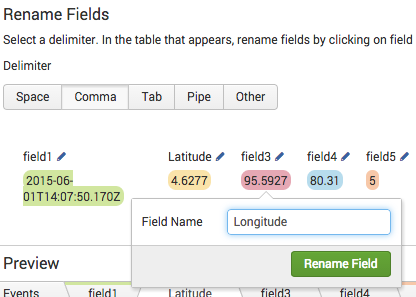
Field Extractor: Rename Fields step
The Rename Fields step of the field extractor is for delimiter-based field extractions only. If you are extracting fields using a regular expression, see the topics for the Select Fields and Validate steps.
In the Rename Fields step you:
- Identify the delimiter that separates the fields in your sample event, such as a space, comma, tab, pipe, or another character or character combination. The field extractor breaks the event out into fields based on your delimiter choice
- Rename one or more the fields that you want to extract from these events.
- Optionally preview the results of the delimiter-based field extraction. This can help you validate the extraction and determine which fields to rename.
Identify a delimiter and rename one or more fields
Identify a delimiter. Rename at least one field.
- Under Rename Fields, select one of the available Delimiter options or provide one of your own.
- The field extractor replaces the sample event with a display of the fields it finds in the event, using the delimiter that you select. It gives each field a color and a temporary name (field1, field2, field3 and so on).
- If you select Space, Comma, Tab, or Pipe, the field extractor breaks the event up into fields based on that delimiter. For example, a string like
2015-06-01T14:07:50:170Z|Jones|Alex|555-922-1212|324 Bowie Street|Alexandria, Vawould get broken up into six separate fields if you choose Pipe as its delimiter.
- If the delimiter is not one of those four options, select Other, and enter the delimiter character or characters in the provided field. Then click the Return key to have the field extractor break up your event into fields based on that delimiter.
- The field extractor also creates a Preview area below the field display that previews how the delimiter-based field extraction works for other events in the dataset represented by your source or source type selection. See "Preview the results of the field extraction."

- (Optional) Review the contents of the Preview section to determine the accuracy of the delimiter-based extraction and identify fields that should be renamed.
- This can help you make decisions about which fields to rename.
- Click on a field that you want to rename.
- A Field Name field appears. Enter the correct field name.
- You must select and rename at least one field to move on to the Save step.
- Click Rename Field to rename the field.
- The field extractor replaces the field temporary name with the name you have provided throughout the page.

- (Optional) Repeat steps 3 and 4 for all additional fields you choose to rename from the event.
- Note: You do not have to rename every field discovered by the field extractor.
- Click Next to go to the Save step.
Preview the results of the field extraction
These actions are optional for the Rename Fields step.
After the field extractor applies delimiter-based field extraction to your sample event, the lower part of the page becomes a Preview section. You can go to the Preview section to preview the results of this extraction against the dataset represented by your chosen source or source type.
The Preview section has features that you can use to inspect the accuracy of the field extraction and identify fields that you may want to rename. It consists of a table that shows the events broken out into fields according to your delimiter choice. It also provides informational tabs for each field that the field extractor discovers.
- (Optional) Change the sample size of the preview dataset to see statistics for a wider range of events.
- The preview section displays results for the First 1,000 events in the dataset by default. You can change the preview set to be the first 10,000 events or the events from the last five minutes, 24 hours, or 30 days.
- (Optional) Review the first column to see if any events failed to match the pattern of the selected event.
- The first column of the Preview event listing table displays a green check mark for events that match the pattern and a red "X" for events that do not match.
- If you have events that do not match, it means that those events may have more or fewer fields than your sample event, and you may want to try using a different delimiter or investigate why your chosen delimiter is only working for some events in your event set.
- You can quickly find rare matching or non-matching events by using the Matches and Non-Matches filters.
- (Optional) Click a field tab to see information about it.
- Each field information tab provides a value distribution for the field, organized from most to least common. It is based on the selected event sample. If the default sample of 1,000 isn't providing values that you expected to see, try changing it to a larger sample.
| Field Extractor: Select Fields step | Field Extractor: Validate step |
This documentation applies to the following versions of Splunk Cloud Platform™: 9.3.2408, 8.2.2201, 8.2.2202, 8.2.2112, 9.0.2205, 8.2.2203, 9.0.2208, 9.0.2209, 9.0.2303, 9.0.2305, 9.1.2308, 9.1.2312, 9.2.2403, 9.2.2406 (latest FedRAMP release)
 Download manual
Feedback submitted, thanks!