馃摎 This guide explains how to use **Weights & Biases** (W&B) with YOLOv5 馃殌. UPDATED 29 September 2021.
* [About Weights & Biases](#about-weights-&-biases)
* [First-Time Setup](#first-time-setup)
* [Viewing runs](#viewing-runs)
* [Advanced Usage: Dataset Versioning and Evaluation](#advanced-usage)
* [Reports: Share your work with the world!](#reports)
## About Weights & Biases
Think of [W&B](https://wandb.ai/site?utm_campaign=repo_yolo_wandbtutorial) like GitHub for machine learning models. With a few lines of code, save everything you need to debug, compare and reproduce your models 鈥� architecture, hyperparameters, git commits, model weights, GPU usage, and even datasets and predictions.
Used by top researchers including teams at OpenAI, Lyft, Github, and MILA, W&B is part of the new standard of best practices for machine learning. How W&B can help you optimize your machine learning workflows:
* [Debug](https://wandb.ai/wandb/getting-started/reports/Visualize-Debug-Machine-Learning-Models--VmlldzoyNzY5MDk#Free-2) model performance in real time
* [GPU usage](https://wandb.ai/wandb/getting-started/reports/Visualize-Debug-Machine-Learning-Models--VmlldzoyNzY5MDk#System-4) visualized automatically
* [Custom charts](https://wandb.ai/wandb/customizable-charts/reports/Powerful-Custom-Charts-To-Debug-Model-Peformance--VmlldzoyNzY4ODI) for powerful, extensible visualization
* [Share insights](https://wandb.ai/wandb/getting-started/reports/Visualize-Debug-Machine-Learning-Models--VmlldzoyNzY5MDk#Share-8) interactively with collaborators
* [Optimize hyperparameters](https://docs.wandb.com/sweeps) efficiently
* [Track](https://docs.wandb.com/artifacts) datasets, pipelines, and production models
## First-Time Setup
<details open>
<summary> Toggle Details </summary>
When you first train, W&B will prompt you to create a new account and will generate an **API key** for you. If you are an existing user you can retrieve your key from https://wandb.ai/authorize. This key is used to tell W&B where to log your data. You only need to supply your key once, and then it is remembered on the same device.
W&B will create a cloud **project** (default is 'YOLOv5') for your training runs, and each new training run will be provided a unique run **name** within that project as project/name. You can also manually set your project and run name as:
```shell
$ python train.py --project ... --name ...
```
YOLOv5 notebook example: <a href="https://colab.research.google.com/github/ultralytics/yolov5/blob/master/tutorial.ipynb"><img src="https://colab.research.google.com/assets/colab-badge.svg" alt="Open In Colab"></a> <a href="https://www.kaggle.com/ultralytics/yolov5"><img src="https://kaggle.com/static/images/open-in-kaggle.svg" alt="Open In Kaggle"></a>
<img width="960" alt="Screen Shot 2021-09-29 at 10 23 13 PM" src="https://user-images.githubusercontent.com/26833433/135392431-1ab7920a-c49d-450a-b0b0-0c86ec86100e.png">
</details>
## Viewing Runs
<details open>
<summary> Toggle Details </summary>
Run information streams from your environment to the W&B cloud console as you train. This allows you to monitor and even cancel runs in <b>realtime</b> . All important information is logged:
* Training & Validation losses
* Metrics: Precision, Recall, mAP@0.5, mAP@0.5:0.95
* Learning Rate over time
* A bounding box debugging panel, showing the training progress over time
* GPU: Type, **GPU Utilization**, power, temperature, **CUDA memory usage**
* System: Disk I/0, CPU utilization, RAM memory usage
* Your trained model as W&B Artifact
* Environment: OS and Python types, Git repository and state, **training command**
<p align="center"><img width="900" alt="Weights & Biases dashboard" src="https://user-images.githubusercontent.com/26833433/135390767-c28b050f-8455-4004-adb0-3b730386e2b2.png"></p>
</details>
## Advanced Usage
You can leverage W&B artifacts and Tables integration to easily visualize and manage your datasets, models and training evaluations. Here are some quick examples to get you started.
<details open>
<h3>1. Visualize and Version Datasets</h3>
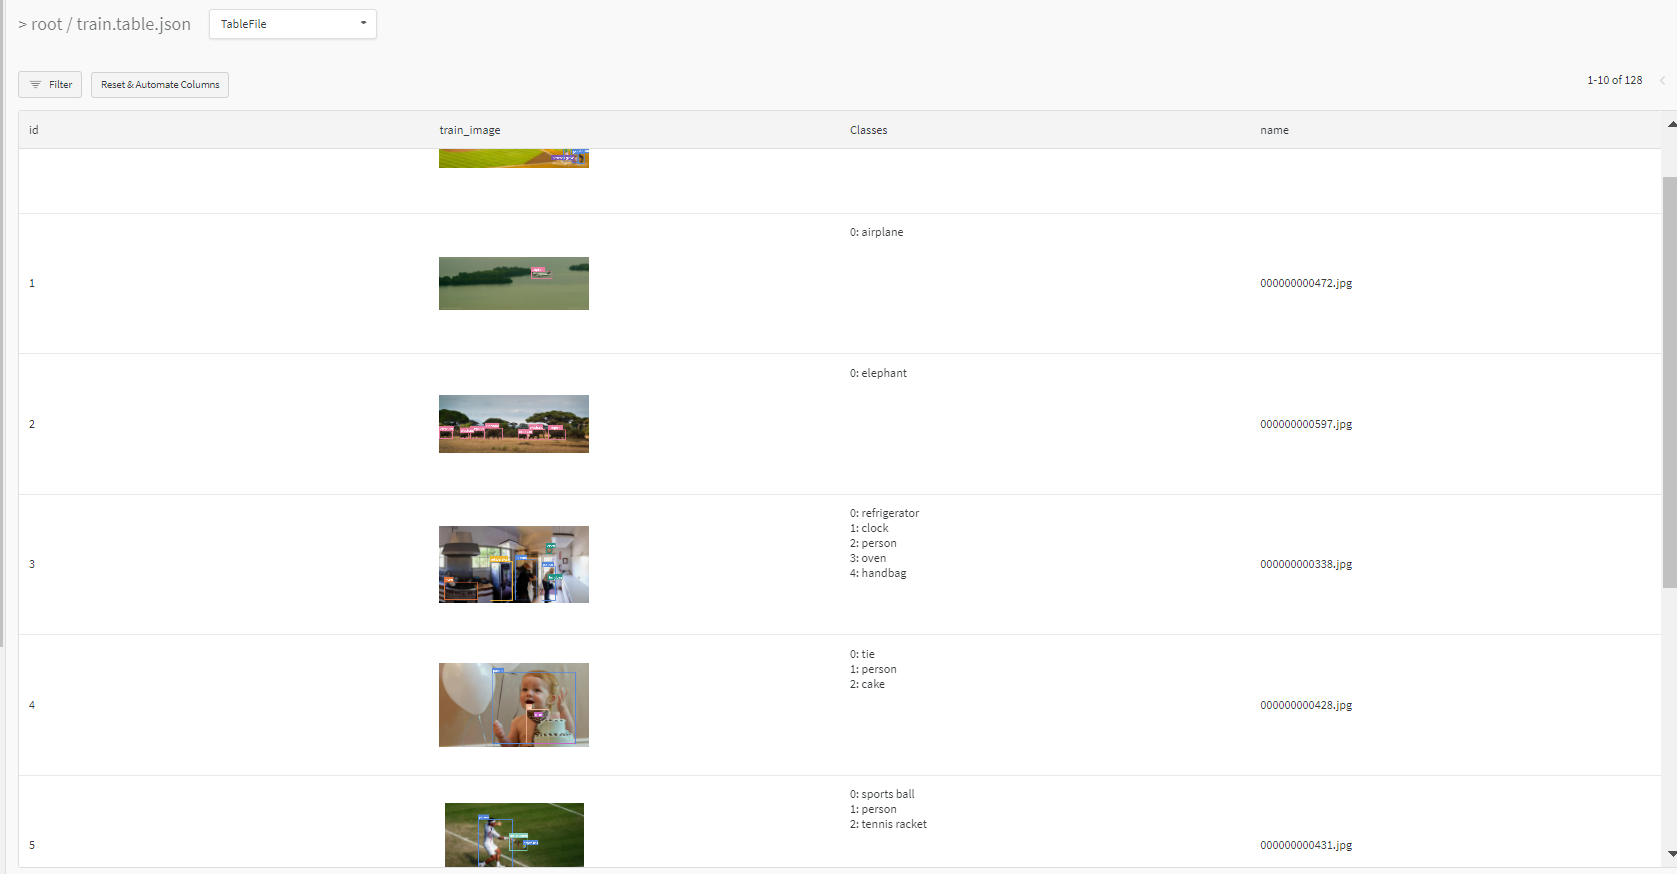
Log, visualize, dynamically query, and understand your data with <a href='http://222.178.203.72:19005/whst/63/=cnbrzvZmcazZh//guides/data-vis/tables'>W&B Tables</a>. You can use the following command to log your dataset as a W&B Table. This will generate a <code>{dataset}_wandb.yaml</code> file which can be used to train from dataset artifact.
<details>
<summary> <b>Usage</b> </summary>
<b>Code</b> <code> $ python utils/logger/wandb/log_dataset.py --project ... --name ... --data .. </code>
</details>
<h3> 2: Train and Log Evaluation simultaneousy </h3>
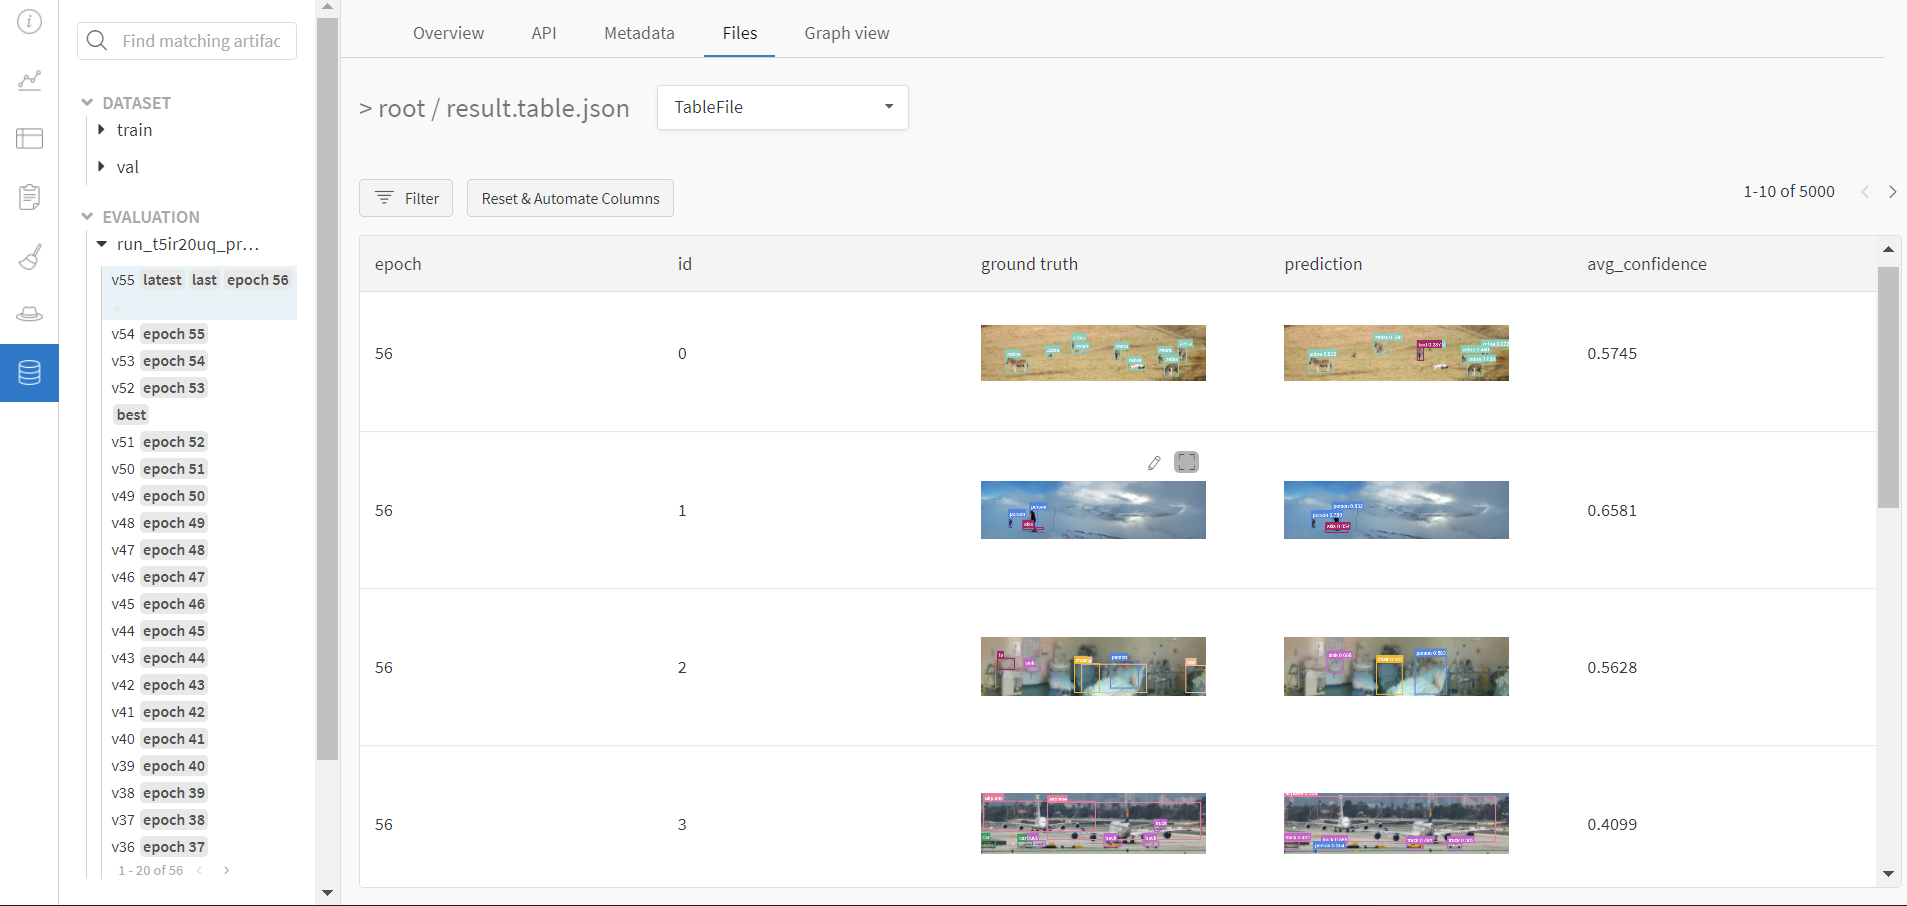
This is an extension of the previous section, but it'll also training after uploading the dataset. <b> This also evaluation Table</b>
Evaluation table compares your predictions and ground truths across the validation set for each epoch. It uses the references to the already uploaded datasets,
so no images will be uploaded from your system more than once.
<details>
<summary> <b>Usage</b> </summary>
<b>Code</b> <code> $ python utils/logger/wandb/log_dataset.py --data .. --upload_data </code>
</details>
<h3> 3: Train using dataset artifact </h3>
When you upload a dataset as described in the first section, you get a new config file with an added `_wandb` to its name. This file contains the information that
can be used to train a model directly from the dataset artifact. <b> This also logs evaluation </b>
<details>
<summary> <b>Usage</b> </summary>
<b>Code</b> <code> $ python utils/logger/wandb/log_dataset.py --data {data}_wandb.yaml </code>

</details>
<h3> 4: Save model checkpoints as artifacts </h3>
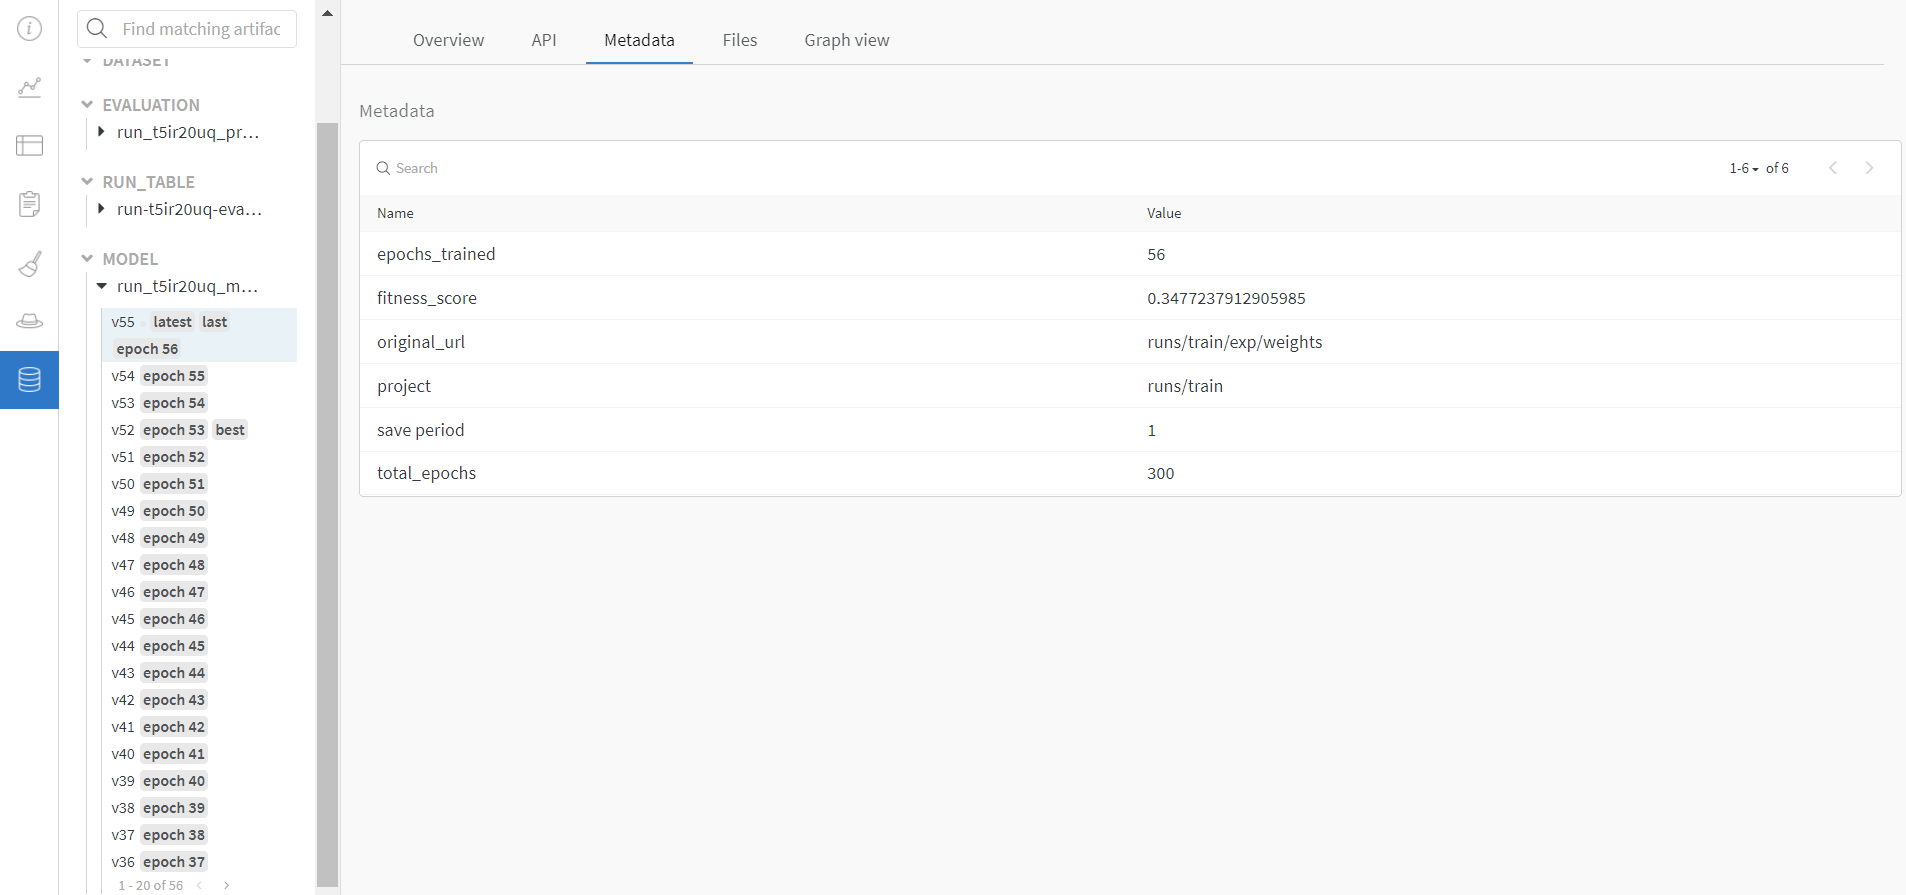
To enable saving and versioning checkpoints of your experiment, pass `--save_period n` with the base cammand, where `n` represents checkpoint interval.
You can also log both the dataset and model checkpoints simultaneously. If not passed, only the final model will be logged
<details>
<summary> <b>Usage</b> </summary>
<b>Code</b> <code> $ python train.py --save_period 1 </code>
</details>
</details>
<h3> 5: Resume runs from checkpoint artifacts. </h3>
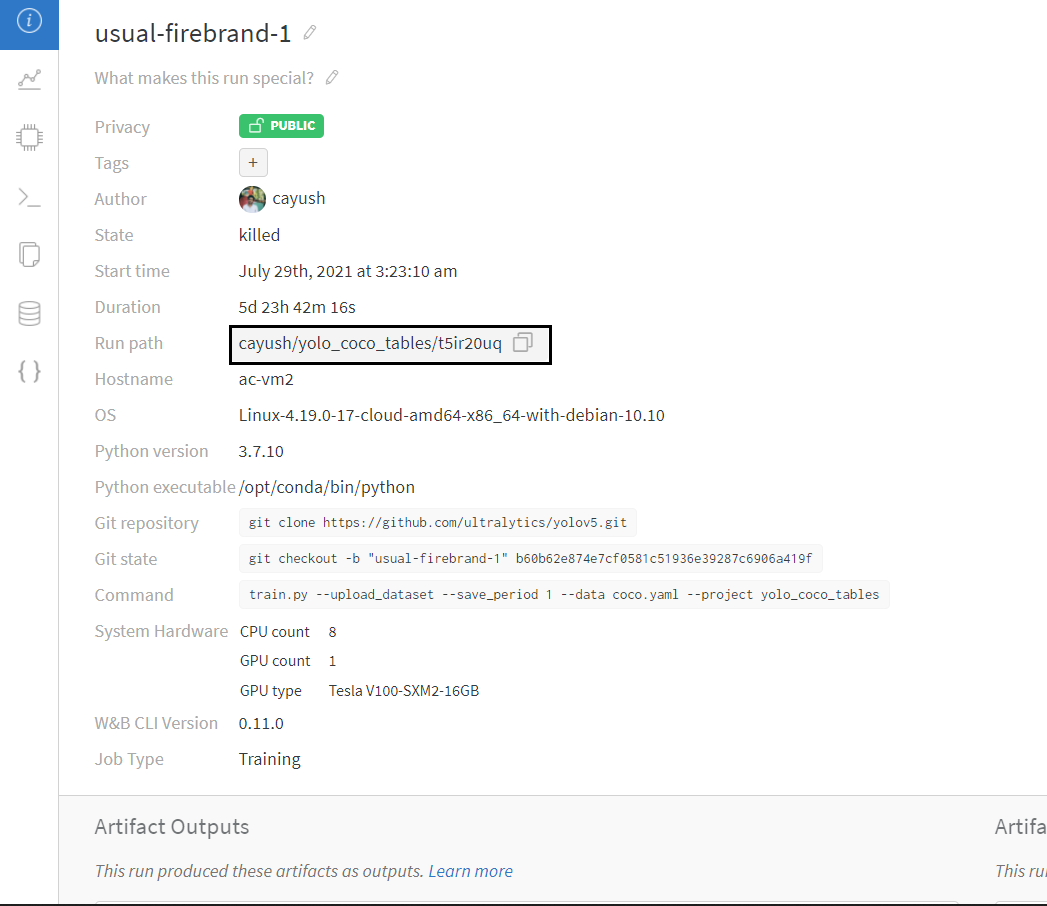
Any run can be resumed using artifacts if the <code>--resume</code> argument starts with聽<code>wandb-artifact://</code>聽prefix followed by the run path, i.e,聽<code>wandb-artifact://username/project/runid </code>. This doesn't require the model checkpoint to be present on the local system.
<details>
<summary> <b>Usage</b> </summary>
<b>Code</b> <code> $ python train.py --resume wandb-artifact://{run_path} </code>
</details>
<h3> 6: Resume runs from dataset artifact & checkpoint artifacts. </h3>
<b> Local dataset or model checkpoints are not required. This can be used to resume runs directly on a different device </b>
The syntax is same as the previous section, but you'll need to lof both the dataset and model checkpoints as artifacts, i.e, set bot <code>--upload_dataset</code> or
train from <code>_wandb.yaml</code> file and set <code>--save_period</code>
<details>
<summary> <b>Usage</b> </summary>
<b>Code</b> <code> $ python train.py --resume wandb-artifact://{run_path} </code>

</details>
</details>
没有合适的资源?快使用搜索试试~ 我知道了~
基于卷积神经网络的车距测量代码

共943个文件
jpg:419个
xml:404个
py:33个
需积分: 5 1 下载量 72 浏览量
2024-12-25
22:41:37
上传
评论
收藏 918.96MB ZIP 举报
温馨提示
基于CNN的车距测量框架 数据收集与标注 收集包含车辆的图像或视频数据。 标注每辆车的位置(边界框)以及它们的真实距离(可以通过激光雷达、超声波传感器等设备获得)。 模型选择 使用预训练的目标检测模型(如YOLO, Faster R-CNN等)来检测图像中的车辆。 选择一个适合深度估计的网络架构,如Monodepth2、DORN等,或者直接使用回归模型预测距离。 特征提取 利用CNN从图像中提取特征。这一步通常由所选的目标检测或深度估计模型自动完成。 距离预测 如果使用的是深度估计模型,则可以直接得到场景中每个像素点的距离信息;对于特定的车辆,可以计算其边界框中心点或其它关键点的平均深度值作为该车的距离。 如果是直接预测距离的模型,则输入车辆的图像特征,输出相应的距离值。 训练模型 使用标注的数据集对模型进行训练,确保模型能够准确地预测车辆距离。 评估与优化 在测试集上评估模型性能,通过调整参数、改进网络结构等方式优化模型。 部署 将训练好的模型部署到实际环境中,进行实时车距测量。 示例代码片段
资源推荐
资源详情
资源评论
收起资源包目录
 基于卷积神经网络的车距测量代码 (943个子文件)
  Dockerfile 821B
 专属教程(必看).docx 701KB
 ~$教程(必看).docx 162B
 .gitignore 50B
 code.iml 479B
 0181.jpeg 161KB
 0190.jpeg 130KB
 0175.jpeg 117KB
 0106.jpeg 116KB
 0161.jpeg 92KB
 0112.jpeg 59KB
 0136.jpeg 36KB
 FTBRVQ5PF6V44{[}MX]FPQ3.jpg 292KB
 10.jpg 270KB
 0076.jpg 254KB
 0068.jpg 243KB
 0329.jpg 242KB
 0090.jpg 239KB
 5.jpg 237KB
 5.jpg 237KB
 5.jpg 237KB
 5.jpg 237KB
 5.jpg 237KB
 5.jpg 237KB
 5.jpg 237KB
 5.jpg 237KB
 0400.jpg 233KB
 $O[%KONJO8GA}1SVR9PSQ)0.jpg 231KB
 $O[%KONJO8GA}1SVR9PSQ)0.jpg 231KB
 $O[%KONJO8GA}1SVR9PSQ)0.jpg 231KB
 0159.jpg 222KB
 0303.jpg 220KB
 0105.jpg 219KB
 0350.jpg 217KB
 0020.jpg 217KB
 0355.jpg 217KB
 15.jpg 217KB
 0311.jpg 216KB
 0378.jpg 212KB
 0322.jpg 208KB
 0335.jpg 207KB
 0356.jpg 206KB
 0393.jpg 204KB
 5(4~G6SSG7YF)PM1M1U%5]6.jpg 203KB
 FTBRVQ5PF6V44{[}MX]FPQ3.jpg 202KB
 0099.jpg 202KB
 0367.jpg 200KB
 0125.jpg 197KB
 10.jpg 194KB
 0084.jpg 194KB
 0075.jpg 192KB
 5(4~G6SSG7YF)PM1M1U%5]6.jpg 191KB
 5(4~G6SSG7YF)PM1M1U%5]6.jpg 191KB
 0184.jpg 190KB
 0344.jpg 190KB
 0179.jpg 188KB
 0118.jpg 187KB
 0133.jpg 184KB
 0213.jpg 184KB
 0365.jpg 183KB
 0313.jpg 183KB
 0306.jpg 182KB
 0304.jpg 179KB
 0233.jpg 179KB
 7.jpg 178KB
 0080.jpg 175KB
 0326.jpg 175KB
 0376.jpg 174KB
 0091.jpg 172KB
 0083.jpg 171KB
 0328.jpg 169KB
 0387.jpg 169KB
 0111.jpg 166KB
 $O[%KONJO8GA}1SVR9PSQ)0.jpg 164KB
 5.jpg 164KB
 0134.jpg 163KB
 0066.jpg 162KB
 0219.jpg 160KB
 0372.jpg 158KB
 15.jpg 157KB
 0338.jpg 156KB
 0222.jpg 156KB
 0346.jpg 154KB
 0348.jpg 154KB
 0366.jpg 153KB
 0321.jpg 149KB
 0160.jpg 148KB
 0310.jpg 148KB
 0220.jpg 147KB
 6.jpg 147KB
 6.jpg 147KB
 0399.jpg 146KB
 0352.jpg 145KB
 0360.jpg 144KB
 0228.jpg 140KB
 0065.jpg 139KB
 0381.jpg 138KB
 0373.jpg 138KB
 0337.jpg 137KB
 0319.jpg 137KB
共 943 条
- 1
- 2
- 3
- 4
- 5
- 6
- 10
资源评论


QQ_1309399183
- 粉丝: 1w+
- 资源: 55
上传资源 快速赚钱
 我的内容管理
展开
 我的资源
快来上传第一个资源
 我的收益 登录查看自己的收益
 我的积分
登录查看自己的积分
 我的C币
登录后查看C币余额
 我的收藏
我的收藏  我的下载
我的下载  下载帮助
下载帮助

 前往需求广场,查看用户热搜
最新资源
- 污水监控 环境监测 云平台
- JAVA实现捡金币闯关小游戏(附源码).zip
- FPGA滤波器设计教程,教你快速设计FIR滤波器并利用IP Core实现 清单: 教程文档一份,示例代码工程一份 文档性质产品
- 视频录制和实时流OBS-Studio-30.2.3-Windows
- 农业经济学名词解释.doc
- 汽车百年发展史.doc
- 浅析幼儿园利用乡土教育资源开发园本课程内容的尝试.doc
- 热电厂锅炉试题.doc
- 三年级数学[下册]脱式计算题300题.doc
- 生物圈是最大的生态系统教学案.doc
- 上学期期末考试七年级语文试卷.doc
- 摄影基础试题-学生版[多选].doc
- 税收不安全因素管理指标+解释.doc
- 水利工程概论复习试题及答案.doc
- 统编版二年级上册语文教学计划.doc
- 污染控制微生物学试题.doc
资源上传下载、课程学习等过程中有任何疑问或建议,欢迎提出宝贵意见哦~我们会及时处理!
点击此处反馈


安全验证
文档复制为VIP权益,开通VIP直接复制
 信息提交成功