Photo editing basics in Photos on Mac
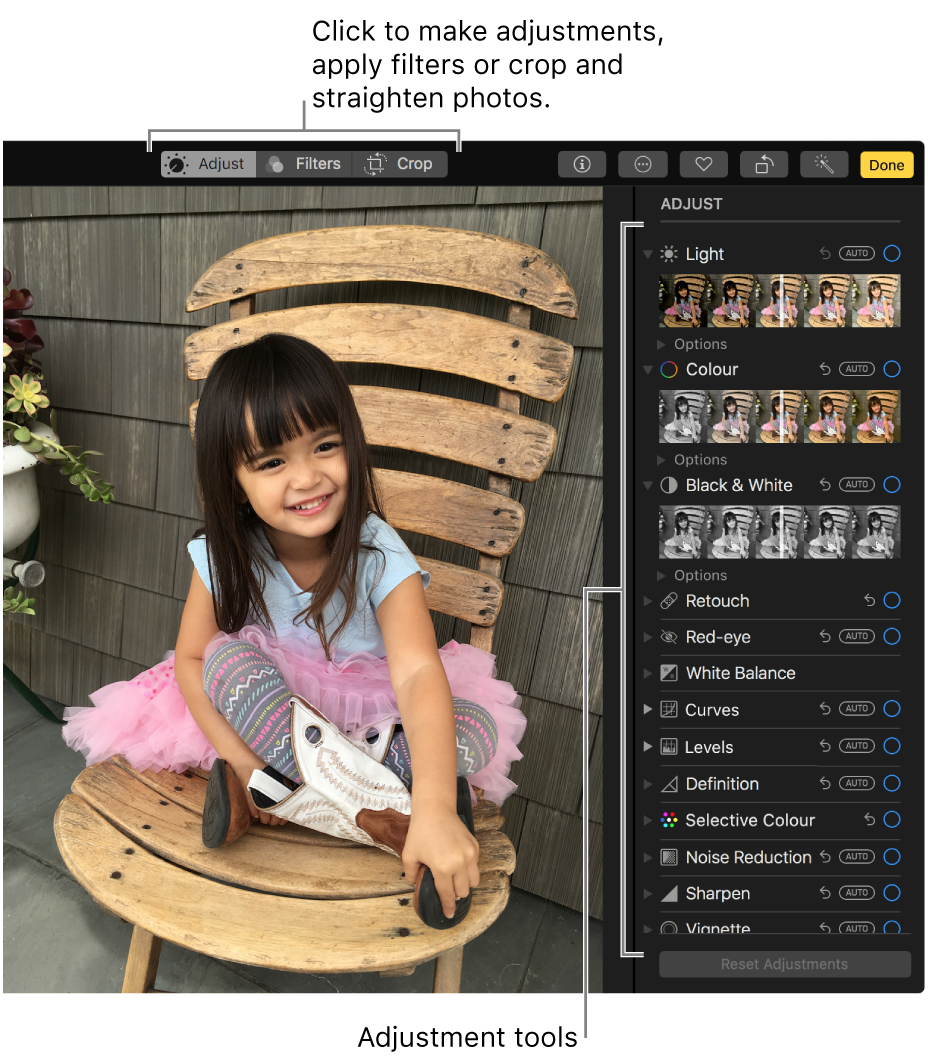
You can use the Photos editing tools to easily make simple changes to your photos, such as rotating them or cropping them to get the best framing.

When you change a photo, Photos keeps the original so you can always undo your changes and revert to the original look.
Changes you make to a photo appear everywhere the photo appears in your library — every album, project and so on. If you want to give a photo a unique look that appears in only one version of the photo, first duplicate the photo and work on the copy.
Edit a photo
In the Photos app
 on your Mac, do one of the following:
Double-click a photo thumbnail, then click Edit in the toolbar.
Select a photo thumbnail, then press Command-Return.
Do any of the following:

Zoom in or out on a photo: Click or drag the Zoom slider.
Make adjustments: Click Adjust to display the adjustment tools. See Adjust a photo’s light, exposure and more.
Apply filters: Click Filters to display filters you can apply to change the look of your photo. See Use a filter to change a photo’s look.
Crop the image: Click Crop to display the options for cropping a photo. See Crop and straighten photos.
Rotate a photo: Click the Rotate button
 in the toolbar to rotate the image anticlockwise. Option-click the button to rotate the image clockwise.
Automatically enhance a photo: Click the Enhance button
 to have the colour and contrast of your photo adjusted automatically. To remove the changes, press Command-Z or click Revert to Original.
To stop editing, click Done or press Command-Return.
While you’re editing a photo, you can press the arrow keys to switch to other photos.
Duplicate a photo
To create different versions of a photo, you duplicate it and work on the copy.
In the Photos app
 on your Mac, select the photo you want to copy.
Choose Image > Duplicate 1 Photo (or press Command-D).
If you’re duplicating a Live Photo, click Duplicate to include the video portion, or Duplicate as Still Photo to include just the still image.
Compare photos before and after editing
While editing a photo, you can compare the edited version with the original.
In the Photos app
 on your Mac, double-click a photo to open it, then click Edit in the toolbar.
To see the original photo, click and hold the Without Adjustments button or press and hold the M key.
Release the button or the M key to see the photo with edits.

Copy and paste adjustments
After you adjust a photo, you can copy the adjustments that you’ve made and paste them on other photos. You can only paste adjustments onto one photo at a time.
Note: You can’t copy and paste the settings from the retouch tool, red-eye tool, crop tool, or third-party extensions.
In the Photos app
 on your Mac, double-click a photo you’ve made adjustments to, then click Edit in the toolbar.
Choose Image > Copy Adjustments.
Double-click the photo to which you want to apply the adjustments, then click Edit.
Choose Image > Paste Adjustments.
Tip: You can also Control-click a photo and choose Copy Adjustments or Paste Adjustments.
Tip: You can quickly remove changes to a photo. To undo the last change you made, choose Edit > Undo or press Command-Z. To discard all changes and start over, select the photo and choose Image > Revert to Original.