Use the Touch Bar on Mac
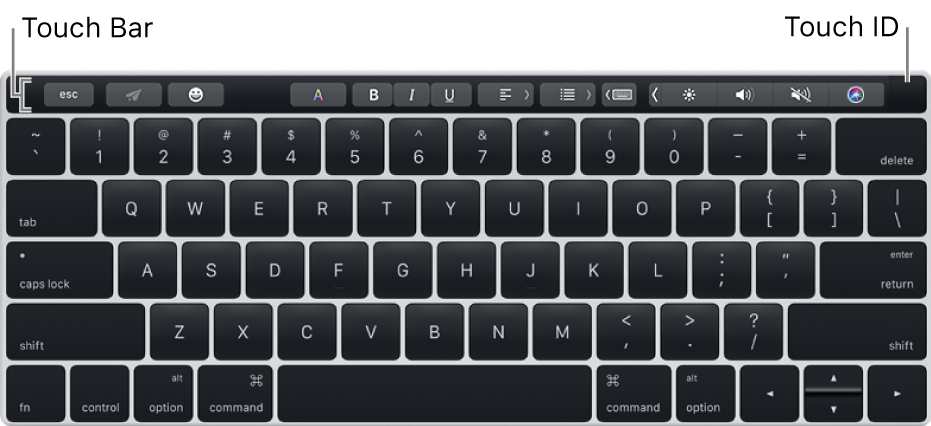
If your Mac has a Touch Bar, you can use familiar gestures — like tap, swipe or slide — directly on the Touch Bar to adjust settings, use Siri, access function keys and do tasks in different apps.

The Touch Bar includes Touch ID, which lets you unlock your Mac and some password-protected items, use Apple Pay to make purchases on the web, and make purchases from the iTunes Store, the App Store and Apple Books. To learn how to set up Touch ID, see Use Touch ID on Mac.
Touch Bar basics
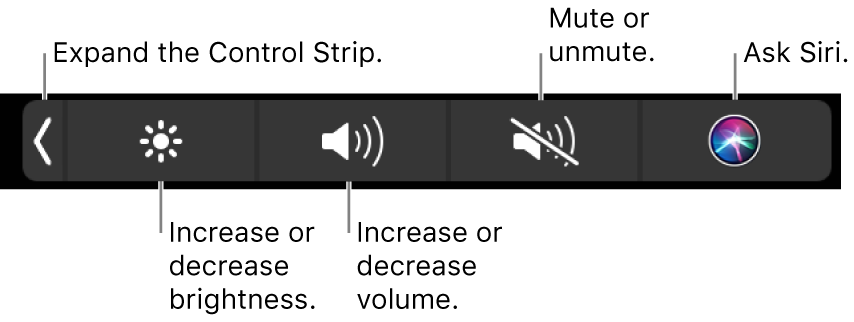
The Control Strip, at the right end of the Touch Bar, lets you adjust common settings — like brightness and volume — and ask Siri. You can expand it to access additional settings and features. The other buttons available in the Touch Bar depend on the app you’re using or the task you’re doing.

Change the brightness or volume, or ask Siri: Tap the buttons in the Control Strip. For brightness and volume, you can also quickly flick left or right on the buttons.

Expand the Control Strip: Tap
 , or press the Fn key on the keyboard (if the “Press Fn key” option in Keyboard preferences is set to expand the Control Strip).
Tap the buttons in the expanded Control Strip to access additional settings and macOS features like Mission Control and Launchpad, or to control video or music playback. For some settings — such as display brightness — you can touch and hold the button to change the setting.

To collapse the Control Strip, tap
 .
.Use other buttons: Tap buttons to quickly do tasks in the app you’re using. Each app is different — try it out to see what you can do. For example, here’s how the Touch Bar looks when you select a file in the Finder:

And here’s how it looks when you view a picture in the Photos app:

To add buttons to the Touch Bar in some apps, see Customise the Touch Bar.
Add emoji to your text: Tap
 , then tap the emoji you want to use.
Typing suggestions
When you’re typing text on your Mac, the Touch Bar can show words or phrases you might want to use next (called typing suggestions), to help you save time.
Show typing suggestions: Tap
 .
.
Use typing suggestions: Tap a word, phrase or emoji. Spelling corrections are shown in blue.

Hide typing suggestions: Tap
 in the Touch Bar.
If you don’t see ![]() in the Touch Bar, choose View > Customise Touch Bar, then select “Show typing suggestions”. Or choose Apple menu
in the Touch Bar, choose View > Customise Touch Bar, then select “Show typing suggestions”. Or choose Apple menu ![]() > System Preferences, click Keyboard, click Text, then select “Touch Bar typing suggestions”.
> System Preferences, click Keyboard, click Text, then select “Touch Bar typing suggestions”.
Colours
In apps where you can change the colour of text or objects, you can use the Touch Bar to select a colour, shade or model (such as RGB or HSB).

Select a colour: Touch and hold
 , then slide your finger to a colour.
Select a shade: Tap
 , touch and hold a colour, then slide your finger to a shade.
Select a model: Tap
 , tap the colour list on the left, then tap a colour model. To use a custom colour you saved, tap Swatches.
Use the sliders for a model to change values, such as hue or saturation. To save your changes to Swatches, tap the colour (a + appears), then tap it again (a tick appears).

Hide colours or the colour values: Tap
 in the Touch Bar.
Function keys
Many macOS keyboard shortcuts use function keys (F1 to F12). For example, if you enabled Dashboard, you can use F12 to show it. The function keys are available in the Touch Bar.
Use the function keys: Press and hold the Fn key on the keyboard (if the “Press Fn key” option in Keyboard preferences is set to show function keys), then tap a function key in the Touch Bar.

If a keyboard shortcut includes a modifier, such as Option or Command, press and hold the Fn key with the modifier key. For example, to use Control-F3 to move to the Dock, press and hold the Fn and Control keys together, then tap F3 in the Touch Bar.
Customise the Touch Bar
For some apps, you can customise the Touch Bar so that it contains buttons for your favourite tasks in that app. You can also change which buttons are shown in the Control Strip.
In an app, choose View > Customise Touch Bar.
Add, rearrange or remove buttons in the Touch Bar.
To switch between changing buttons for the current app and the Control Strip, just tap the Touch Bar. (You can’t customise buttons for all apps.)
Add buttons: Use the trackpad or mouse to drag a button from the screen to the Touch Bar; buttons in the Touch Bar jiggle slightly.
Rearrange buttons: Use your finger on the Touch Bar to drag a button.
Remove buttons: Use the trackpad or mouse to drag a button from the Touch Bar to the screen.
When you’ve finished, click Done on the screen or tap Done in the Touch Bar.
You can also customise the Control Strip in System Preferences. Choose Apple menu ![]() > System Preferences, click Keyboard, click Keyboard, then click Customise Touch Bar.
> System Preferences, click Keyboard, click Keyboard, then click Customise Touch Bar.
Set options for the Touch Bar
You can set options that change what’s shown in the Touch Bar. For example, instead of showing app buttons and the collapsed Control Strip, you can have the Touch Bar show just the expanded Control Strip or just app buttons. You can also change what happens when you press the Fn key on the keyboard.
On your Mac, choose Apple menu
 > System Preferences, click Keyboard, then click Keyboard.
 Set options.
Touch Bar shows: Click the pop-up menu, then choose an option — App Controls, Expanded Control Strip, F1, F2, etc. Keys, or Quick Actions.
If you don’t want the Control Strip to be shown at the same time as app buttons or Quick Actions, deselect Show Control Strip.
Press Fn key to: Click the pop-up menu, then choose an option.
The options available depend on what you set for “Touch Bar shows”.
You can use the Automator app to create custom workflows for Quick Actions that are available in the Touch Bar if you set the options for the Touch Bar to show them or added the Quick Actions button to the Touch Bar.
To always show function keys (F1, F2, etc.) in the Touch Bar for specific apps, choose Apple menu > System Preferences, click Keyboard, click Shortcuts, select Function Keys in the list on the left, then add the apps on the right.