Select ranges in Final Cut Pro for Mac
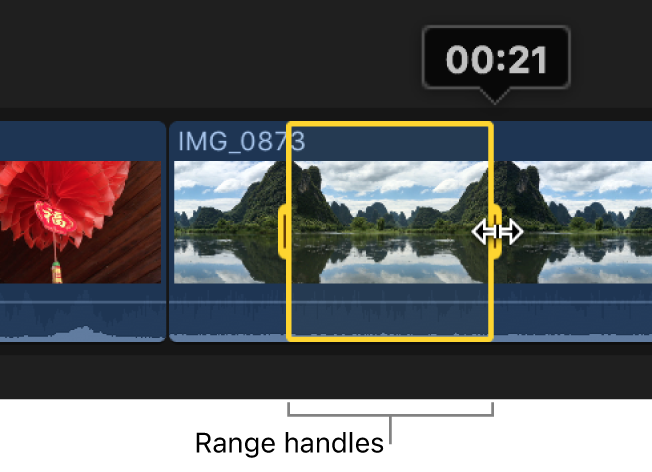
Instead of selecting whole clips, you can select a range within any clip in the timeline or the browser. In the timeline, you can also select a range that spans multiple clips. You can trim range selections, mark them with ratings and keywords, and modify them in other ways. You can adjust the range selection start and end points by dragging either side of the selection. You can also create multiple range selections in one or more clips in the browser.

Note: This illustration shows a timeline range selection. Browser range selections have straight range handles.
Select a range in the browser
In the Libraries sidebar in Final Cut Pro, select an event.
In the browser, do any of the following:
Drag across any clip’s filmstrip.
A yellow border appears around the range you selected.
If the filmstrip wraps onto two lines, you can select a range extending over the break simply by continuing to drag across the break. When you reach the edge, the pointer jumps to the next line.
Tip: Option-drag across any clip’s filmstrip with existing ranges to replace those ranges with a new range.
Use the I and O keys to set the range selection start and end points. See Set a range start point or end point, below.
Move the skimmer (or the playhead) over a clip, then press X.
Final Cut Pro sets the range selection start and end points at the clip start and end points.
Click a marker line at the top of a clip.
These marker lines can indicate any of the following: clips marked as favorite (green) or rejected (red), manually applied keywords (blue), or analysis keywords (purple).
Select a range in the timeline
In Final Cut Pro, open an existing project.
In the timeline, do any of the following:
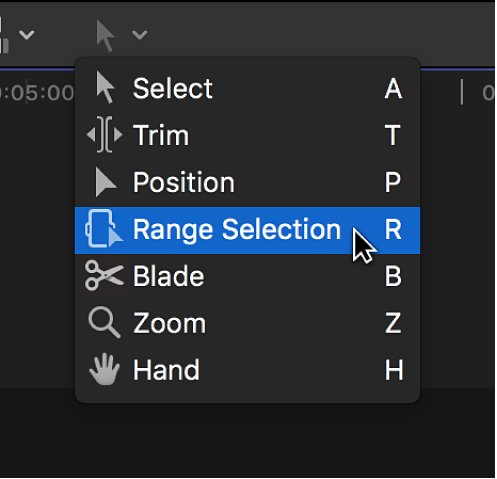
Click the Tools pop-up menu in the top-left corner of the timeline and choose Range Selection (or press R).

The pointer changes to the Range Selection tool
 .
.Drag the Range Selection tool across one or more clips to select a range. To adjust the range selection start and end points, drag the range handles on either side of the range.
Tip: To temporarily switch to the Range Selection tool, hold down the R key. When you release the R key, the tool reverts to the previously active tool.
Use the I and O keys to set the range selection start and end points. See Set a range start point or end point, below.
Move the skimmer (or the playhead) over a clip, then press X.
Final Cut Pro sets the range selection start and end points at the clip start and end points.
Tip: To use this keyboard shortcut with connected clips or clips in a connected storyline, position the pointer on the clip, then press X.
Set a range start point or end point
In the Final Cut Pro browser or timeline, do any of the following:
Set the start point: Position the skimmer (or the playhead, if skimming is turned off) where you want the selection to start, then choose Mark > Set Range Start (or press I).
To remove the range start point, press Option-I.
Set the end point: Position the skimmer (or the playhead, if skimming is turned off) where you want the range to end, then choose Mark > Set Range End (or press O).
To remove the range end point, press Option-O.
Set the range start point or end point while a clip or your project is playing: Press the Space bar to start playback, then press the I or O key when you want to set the start or end point.
Tip: In the browser, you can press Shift-Command-I and Shift-Command-O to set multiple ranges during playback.
If you’re using the Blade, Trim, and Range Selection tools in the timeline or in the precision editor, you can use the I and O keys to set selection start and end points in a connected clip or storyline, as well as in clips underneath connected clips and storylines. Move the pointer directly over a clip and press I to set a selection start point, or press O to set a selection end point. See Cut clips in two in Final Cut Pro for Mac, Make roll edits in Final Cut Pro for Mac, and Use the precision editor in Final Cut Pro for Mac.
Extend or shorten the range selection
In the Final Cut Pro browser or timeline, do any of the following:
Adjust where the range starts or ends: Drag the left or right edge of the yellow selection border.
Reset the start point or end point for a range within the same event clip or project: Move the skimmer, then press I or O.
If the skimmer is not present, you can turn on skimming.
Tip: You can also press the I or O key while a clip is playing back.
Extend or shorten a range within an event clip: Move the skimmer to any frame that you want the range to begin or end with, then hold down the Shift key and click (or drag).
Extend or shorten a range using timecode: Choose Modify > Change Duration (or press Control-D), then enter a new duration using your keyboard. As you type, the duration value appears in the timecode display below the viewer. (This method works with single range selections only.)
Set the range selection to match the boundaries of the clip
Clear ranges
You can remove one or more ranges from the browser or the timeline.
Note: This operation does not affect the clip media in either the browser or the timeline.
In the Final Cut Pro browser or timeline, do any of the following:
Remove an individual range in an event: Option-click the range.
Remove a range in the timeline: Click outside of the range, or select a different range.
Clear one or more ranges in the browser or the timeline: Select the range or ranges, then choose Mark > Clear Selected Ranges (or press Option-X).
Selected ranges have a thick yellow border. Unselected ranges (available only in the browser) have a thin orange border.
Remove all ranges in an event: Choose Edit > Select All (or press Command-A) to select all ranges in the current event, then choose Mark > Clear Selected Ranges (or press Option-X).
Download this guide: PDF