Zoho Invoice - Email Integration
Your interaction with your customers and vendors doesn’t just stop with you sending estimates or invoices. Apart from that, you might also be sending them emails from your personal email address, thanking them for their purchase or sending them important documents to be signed and so on.
Any transaction that you send out using Zoho Invoice would be a system generated mail. This means that your customers will have to reply to your personal email address. There is a chance that you might miss these emails in the huge stack of emails coming in everyday.
Not anymore. With the new Email Integration feature, you can now add your personal email address to your Zoho Invoice organization, and the mails between this email address and the contact’s email address will be fetched directly into the Mails section under your Contact in Zoho Invoice.
Once this integration is setup, all your emails will be fetched and displayed here in Zoho Invoice.
IN THIS PAGE…
Configuring your email address
There are two ways by which you can configure your email address.
Method 1:
- From Settings, navigate to Integrations.
- Under Integrations, find Other Apps.
- Under Other Apps, you will find G Suite/Gmail and Office 365/Outlook integrations.
- Click on Enable Integration to connect with any one of them.

Method 2:
- Open the Contacts module and click on the concerned contact.
- Select Mails.
- Under Mails, click on Connect your mail account option on the right, as shown in the image below:

- You can choose between Gmail and Outlook, or click on Link with work account to connect with your G Suite or Office 365 account.
Points to remember
- You can choose between G Suite/Gmail and Office 365/Microsoft Outlook, as your personal email address.
- You can have only one active email address connected to your Zoho Invoice organization.
What are the benefits of this feature?
Once the emails are fetched into your contact’s Mails, you can add the mail to the concerned Invoice, Estimate or to the Contact Activity page, by clicking on the Add mail to drop-down as shown in the image below:

Also, if the mail contains attachments, you can attach them to the contact by clicking on the paperclip icon next to the Add mail to option, as shown in the image below:


Insight: You can attach upto 10 files, of 5 Mb each.
If the mail you are searching for hasn’t been fetched yet, click on the  button on the top right corner.
Changing your integrated email address
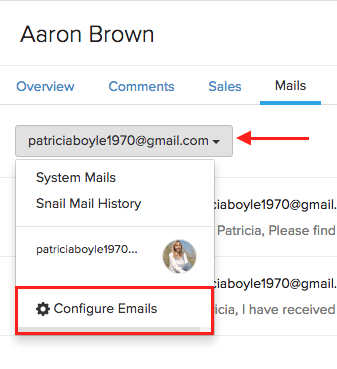
You can change your email address by clicking on the email address, and selecting Configure Emails, as shown below:


You can also do it by going to Integrations > Other Apps > Configure Emails.
Warning: If you wish to switch your email address, you will have to disconnect the existing one and connect the new email address.
Disabling integration
You can disable email integration by navigating to Integrations > Other Apps > Disable Integration, available beside your email address.


 Thank you for your feedback!